| TECHNICAL |
|
SUBJECT: |
|
NO.: |
|
09-15-93 |
|
Camshaft Timing Belt |
|
|
|
|
| SERVICE |
|
Replacement/Adjustment |
|
GROUP: |
|
Engine |
|
Service Procedure |
|
|
|
|
| BULLETIN |
|
|
|
DATE: |
|
Sep.17, 1993 |
|
|
|
|
|
|
| This Bulletin Is Supplied As Technical Information Only And Is
Not An Authorization For Repair. |
| NOTE: |
THIS BULLETIN SUPERSEDES TECHNICAL SERVICE BULLETIN NO. 09-06-92. IT
PROVIDES A DETAILED PROCEDURE FOR PERFORMING THE 60,000 MILE MAINTENANCE
REQUIRED FOR THESE VEHICLES. |
MODELS:
1990 - 1993 (BD) Laser/Talon
| NOTE: |
THIS BULLETIN APPLIES TO VEHICLES EQUIPPED WITH 2.OL DOHC ENGINES
(TURBO AND NON-TURBO). |
DISCUSSION:
The purpose of this bulletin is to emphasize the importance of performing
the timing belt replacement and camshaft timing in the proper sequence to assure
complete and satisfactory service.
A videotape demonstrating the procedure was included with the August, 1993
Chrysler Master Tech Program.
REPAIR PROCEDURE:
Camshaft Timing Belt Removal:
It may be convenient to raise the vehicle on a hoist to a level where work
can be performed through the wheel well and over the top of the fender.
- Remove lower left engine compartment splash shield.
- Support engine with engine support fixture, tool #C-4852 or #7137, and
remove the left engine mount and bracket (Figure 1).
![[Figure 1]](fig1.gif)
Figure 1
- Loosen the water pump pulley bolts. Remove the alternator/water pump drive
belts, and the power steering drive belt.
Important: Loosen water
pump pulley bolts before removing belt.
- Remove water pump pulley.
- Remove the tensioner pulley bracket and the A/C belt.
- Remove crankshaft pulley.
- Remove the upper and lower timing belt covers.
- Rotate the crankshaft clockwise and align the timing marks so as to bring
the No. 1 piston to the Top-Dead-Center (TDC) position of the compression
stroke.
Caution: Rotate the crankshaft in a clockwise
direction.
The camshaft sprocket dowel pins must be at the
12 o'clock position and the camshaft sprocket timing marks must be aligned
together (left sprocket at the 3 o'clock and right sprocket at the 9 o'clock
positions). Both camshaft sprocket timing marks must be in line with the top
surface of the cylinder head (Figure 2). [A straight edge (ruler) laid across
the center of the cam shaft attaching bolts will help you to better see and
align the timing marks.] The crankshaft and oil pump sprockets must also be
aligned with their respective timing marks (Figure 2).
| NOTE: |
Crankshaft may need to be rotated up to six turns before all
sprockets are properly aligned and the rear balance shaft is in phase, due to
the oil pump-to balance shaft gear ratio. |
![[Figure 2]](fig2.gif)
Figure 2
- Remove rubber plug from inner timing belt cover and screw special tool no.
MD998738 into the engine left support bracket until it makes contact with the
tensioner arm (Figures 3 & 4).
- Loosen the tensioner pulley center bolt (Figure 4).
![[Figure 3]](fig3.gif)
Figure 3
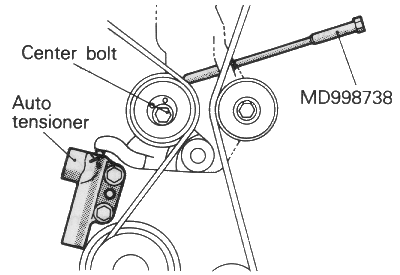
Figure 4
- Compress the Auto Tensioner push rod by SLOWLY rotating special
tool no. MD998738 until hole in Auto Tensioner push rod aligns with the hole in
the Auto Tensioner body (Figure 5).
| NOTE: |
PUSH ROD MAY NEED TO BE ROTATED IF HOLE IN ROD IS NOT VERTICALLY IN
LINE WITH HOLE IN HOUSING. |
- Insert a 1/16 inch allen wrench or similar pin {1.4 mm (.055 in.) in
diameter} into the aligned holes to hold the push rod in the reset (pinned)
position. Back off special tool MD998738 once auto tensioner is in the reset
position (Figure 5).
![[Figure 5]](fig5.gif)
Figure 5
| NOTE: |
INSPECT THE TENSIONER AND REPLACE IT IF IT SHOWS SIGNS OF OIL LEAKAGE. |
| Figure 6 - obsolete via '94 TSB - No longer
deemed necessary to replace 91mm auto tensioner with new design 100mm auto
tensioner. |
- Remove and discard the camshaft timing belt.
Removal of Timing Belt "B"
- Loosen timing belt "B" tensioner pulley center bolt (Figure 7).
![[Figure 7]](fig7.gif)
Figure 7
- Remove and discard timing belt "B".
Timing Belt Installation:
Timing Belt "B":
- Ensure that the crankshaft sprocket and the silent shaft sprocket timing
marks are aligned. Install new timing belt "B" over crankshaft
sprocket "B", around the tensioner pulley, and over the silent shaft
sprocket. Do not leave any slack on the tension side of the belt (Figure 8).
![[Figure 8a]](fig8a.gif) 1990-1992 Models
1990-1992 Models
![[Figure 8b]](fig8b.gif) 1993 Models
1993 Models
Figure 8
- Push the timing belt "B" tensioner up to place pressure on the
timing belt so that the tension side is taut. Belt tension should be 5-7 mm
(.20-.28 in.) using the belt deflection method. Tighten the tensioner center
bolt and torque to 15-22 Nm (11-16 ft. lbs.) (Figure 7).
| CAUTION: |
WHEN TIGHTENING THE BOLT, ENSURE THAT THE TENSIONER PULLEY SHAFT DOES
NOT ROTATE WITH THE BOLT. ALLOWING IT TO ROTATE CAN CAUSE EXCESSIVE TENSION ON
THE BELT. |
CAMSHAFT TIMING BELT:
- Rotate the camshaft timing belt tensioner pulley so that the pinholes are
to the left of the center bolt. Tighten the center bolt finger-tight (Figure
4).
| NOTE: |
LEAVE THE ALLEN WRENCH INSTALLED IN THE AUTO TENSIONER. |
- Make sure the camshaft sprocket dowel pins are located at the 12 o'clock
position and the camshaft sprocket timing marks are aligned together (left
sprocket at the 3 o'clock and right sprocket at the 9 o'clock positions). Both
camshaft sprocket timing marks should be in line with the top surface of the
cylinder head (Figure 2).
| NOTE: |
THE EXHAUST CAMSHAFT SPROCKET MAY ROTATE IN THE COUNTERCLOCKWISE
DIRECTION. THIS SHOULD BE CONSIDERED WHEN INSTALLING THE TIMING BELT. |
- Make sure that the crankshaft sprocket and the oil pump sprocket is aligned
with the timing mark pointers (Figure 9).
![[Figure 9a]](fig9a.gif) 1990-1992 Models
1990-1992 Models
![[Figure 9b]](fig9b.gif) 1993 Models
1993 Models
Figure 9
- Remove the balance shaft plug on the rear side of the cylinder block and
insert a Phillips screwdriver {shank diameter 8 mm (.31 in.)} through the hole.
The balance shaft is in the correct position if the screwdriver can be inserted
at least 60 mm (2.4 in.). If the inserted depth is less than this only 20-25 mm
(.8-1.0 in.), the oil pump sprocket must be rotated one full turn and timing
marks realigned. Recheck the balance shaft position using the screwdriver to
ensure that it can be inserted 60 mm (2.4 in.) or more. Keep the screwdriver
inserted until timing belt installation is complete (Figure 10).
| Caution: |
MAKE SURE THE BALANCE SHAFT IS PROPERLY POSITIONED. It is possible
for the oil pump sprocket timing marks to be properly aligned, and have the
balance shaft out of phase. This could result in a SEVERE engine vibration. |
![[Figure 10]](fig10.gif)
Figure 10
![[Figure 11]](fig11.gif)
Figure 11
- Install the new timing belt over the intake side camshaft sprocket and
clamp it in position with a clip (Figure 11).
- Use a wrench to maintain alignment of the two camshafts and install the
timing belt over the exhaust side sprocket, aligning the timing marks as shown
in Figure 2 and clamp the belt in position with a clip (Figures 12 & 13).
![[Figure 12]](fig12.gif)
Figure 12
![[Figure 13]](fig13.gif)
Figure 13
- Position the timing belt around the idler pulley, oil pump sprocket,
crankshaft sprocket and tensioner pulley (in that order) as shown in Figure 14.
![[Figure 14]](fig14.gif)
Figure 14
![[Figure 15]](fig15.gif)
Figure 15
- Rotate the tensioner pulley in a clockwise direction and tighten the center
bolt (Figure 15).
| NOTE: |
MAKE SURE ALL TIMING BELT TEETH ARE ENGAGED WITH THE TEETH ON THE
CAMSHAFTS, OIL PUMP, AND CRANKSHAFT SPROCKETS AND THAT ALL TIMING MARKS ARE
STILL PROPERLY ALIGNED. |
| Oil Pump Sprocket Nut Replacement - obsolete via '94
TSB - No longer deemed necessary to replace or even check oil pump
sprocket nut. Probably a good thing to check anyway. Lubricate the threads and
torque to 55 Nm (40 ft. lbs.) (Figure 14). |
- Remove the screwdriver from the balance shaft hole and install the plug.
- Remove the two clips holding the belt to the camshaft sprockets.
- Rotate the crankshaft a ¼ turn counterclockwise, then rotate it
clockwise until the timing marks are aligned again. Crankshaft position should
still be at the No. 1 cylinder TDC position of the compression stroke.
| NOTE: |
MAKE SURE THAT ALL OF THE TIMING MARKS ARE STILL ALIGNED. |
- Loosen the tensioner pulley center bolt, attach special tool no. MD998767
(or MD998752) and apply 2.7 Nm (24 in. lbs.) torque to pulley (with beam type
torque wrench) as shown in Figure 16. WITH TORQUE APPLIED TO THE TENSIONER
PULLEY, tighten the attaching bolt, then torque to 49 ± 6 Nm (36 ±
4 ft. lbs.).
![[Figure 16]](fig16.gif)
Figure 16
![[Figure 17]](fig17.gif)
Figure 17
| Caution: |
Failure to follow this procedure will cause the belt tension to
exceed the range of the auto tensioner limits and result in premature timing
belt failure or jumping. |
| NOTE: |
IF THE VEHICLE BODY INTERFERES WITH THE SPECIAL TOOL AND THE TORQUE
WRENCH, RAISE THE ENGINE UP SLIGHTLY UNTIL THERE IS ADEQUATE CLEARANCE. |
- SLOWLY rotate the special tool no. MD998738 until it makes contact
with the tensioner arm and remove the allen wrench from the auto tensioner
(Figure 17).
- Back off the special tool and rotate the crankshaft SIX complete
turns clockwise.
- Measure the auto tensioner push rod position with a drill bit (distance
between the tensioner arm and auto tensioner body) to ensure that it falls
within the specification of 3.8-4.5 mm (.15-.18 in.) as shown in Figure 18.
![[Figure 18]](fig18.gif)
Figure 18
| NOTE: |
WAIT 15 MINUTES AFTER THE ALLEN WRENCH IS REMOVED FROM AUTO TENSIONER
(FOR PLUNGER ROD TO STABILIZE) BEFORE MEASURING. IF THE PLUNGER ROD IS OUT OF
SPECIFICATION, RESET THE AUTO TENSIONER (STEPS 10, 11 AND 12) AND REPEAT STEPS
29 THROUGH 32 UNTIL THE SPECIFIED VALUE IS OBTAINED. |
- Remove special tool no. MD998738 and install the rubber plug to the inner
timing belt cover.
- Install the upper and lower timing belt covers as shown in Figure 19.
(Rotate the bottom of the lower cover toward the rear to assist in clearing the
water pump).
![[Figure 19]](fig19.gif) |
| Thread diameter |
| × thread length |
| mm (in.) |
| A: 6 x 16 (.24 x .63) |
| B: 6 x 18 (.24 x .70) |
| C: 6 x 25 (.24 x .98) |
| D: 6 x 28 (.24 x 1.10) | |
Figure 19 |
Note that timing cover bolts
vary in length. Make sure that the proper size bolts are installed in the
correct hole locations. (Figure 19)
- Install crankshaft pulley and torque to 25 ± 5 Nm (18 ± 4 ft.
lbs.).
- Install A/C tensioner bracket with A/C belt and torque to 25 ± 2 Nm
(18 ± 4 ft. lbs.). Adjust belt tension to 5.5-6.0 mm (.220-.240 in.) belt
deflection.
- Install water pump pulley.
- Install alternator/water pump and power steering drive belts and adjust
belt tension as follows:
|
|
Belt Deflection |
| Alternator/Water Pump Belt |
|
9.0-11.5 mm (.354-.453 in.) |
| Power Steering Belt |
|
6.0-9.0 mm (.240-.354 in.) |
- Install left front engine mount and bracket and torque to the
specifications shown in Figure 20.
Figure 20
- Remove engine support fixture.
- Install lower engine compartment splash shield.
POLICY: Information Only.